Today's post on the lever cam is, I think, a fairly significant milestone on the build: the very last pre-production prototype.
That means that I have now made at least one of every single part of the machine!
Although, like the brew reservoir, the production version will be cast in bronze, I wanted a dimensional prototype to make sure everything fits together. The idea here is to make a functional part that will be used to test the production techniques, tolerances, fit of the part in the piston assembly and the assembly method itself. Though it has to work at least briefly to test the assembly, certain "best practices" can be ignored. In other words: any goes ;)
I start with a scrap of mic6 tooling plate that was leftover from another project. The bottom few millimeters of the block are clamped in the vise and, using a roughing endmill, I cut the basic profile of the clevis or fork.

Then I move to a finishing endmill for the last pass.

Two starting pilot holes for the bearing shafts and the pin.

and, after changing setup of the support blocks underneath, the two holes are first drilled close to the final diameter and then reamed to get a good tolerance.

Then it is time to flip the part over and remove the sacrificial base that was in the vise.

Then the block is rotated in the vise again to cut the space between the forks.

Fork!

Next up, the bearing shafts. These are turned from my new friend: 7075 aluminum. Faster than a speeding bullet. Able to bend steel with its bare hands... etc. I ground down a cut-off blade to make the very narrow groove for the retaining ring.


The design guides for bearings call for a fairly tight tolerance on the shaft (I wont go into a rant here on the Byzantine naming conventions for fits). Suffice it to say that Brugnetti (or at least the guy on the shop floor that day) ignored the design guides and I did not.

The shafts are then finished with a slightly over-sized hub to provide an interference fit with the holes in the clevis. Then they are driven into the fork with a soft hammer.

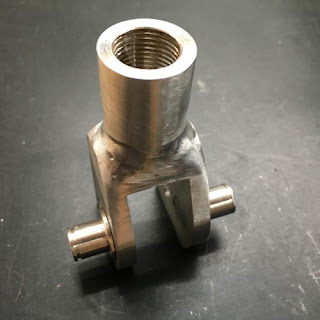
Shafts in place. (I goofed on the length of the first hub, which was supposed to be flush with the inside of the fork wall).

The last piece of the weldment is the receiver for the lever shaft. Again in 7075.

I cut the negative of the top of the fork block in the end of the tube to make a decent fit prior to welding and then the part goes back to the lathe for the internal threading.

So, the metallurgically (that's not a word but never mind) inclined who have been following thus far are saying: "haha - he doesn't know that you can't weld 7075 aluminum!" Well, I say to them: "Yes you can. It is just not a very good idea." ;).
Here is a test weld using 5xxx alloy filler material to join some 7075 rod to a 6061 plate.

And to show that "micro-cracking" is actually "micro-cracking my ^@&^%":

In all seriousness however, this is not how this should be done.
But this is just a test... so I'm just gonna weld this mess together:

Mediocre welding technique aside (anyone looked closely at a Cannondale bike frame?), what was many is now one.

And polishing makes it look, if not perfect, then just a wee bit better.
One test cam? Check!

That means that I have now made at least one of every single part of the machine!
Although, like the brew reservoir, the production version will be cast in bronze, I wanted a dimensional prototype to make sure everything fits together. The idea here is to make a functional part that will be used to test the production techniques, tolerances, fit of the part in the piston assembly and the assembly method itself. Though it has to work at least briefly to test the assembly, certain "best practices" can be ignored. In other words: any goes ;)
I start with a scrap of mic6 tooling plate that was leftover from another project. The bottom few millimeters of the block are clamped in the vise and, using a roughing endmill, I cut the basic profile of the clevis or fork.

Then I move to a finishing endmill for the last pass.

Two starting pilot holes for the bearing shafts and the pin.

and, after changing setup of the support blocks underneath, the two holes are first drilled close to the final diameter and then reamed to get a good tolerance.

Then it is time to flip the part over and remove the sacrificial base that was in the vise.

Then the block is rotated in the vise again to cut the space between the forks.

Fork!

Next up, the bearing shafts. These are turned from my new friend: 7075 aluminum. Faster than a speeding bullet. Able to bend steel with its bare hands... etc. I ground down a cut-off blade to make the very narrow groove for the retaining ring.


The design guides for bearings call for a fairly tight tolerance on the shaft (I wont go into a rant here on the Byzantine naming conventions for fits). Suffice it to say that Brugnetti (or at least the guy on the shop floor that day) ignored the design guides and I did not.

The shafts are then finished with a slightly over-sized hub to provide an interference fit with the holes in the clevis. Then they are driven into the fork with a soft hammer.

Shafts in place. (I goofed on the length of the first hub, which was supposed to be flush with the inside of the fork wall).

The last piece of the weldment is the receiver for the lever shaft. Again in 7075.

I cut the negative of the top of the fork block in the end of the tube to make a decent fit prior to welding and then the part goes back to the lathe for the internal threading.

So, the metallurgically (that's not a word but never mind) inclined who have been following thus far are saying: "haha - he doesn't know that you can't weld 7075 aluminum!" Well, I say to them: "Yes you can. It is just not a very good idea." ;).
Here is a test weld using 5xxx alloy filler material to join some 7075 rod to a 6061 plate.

And to show that "micro-cracking" is actually "micro-cracking my ^@&^%":

In all seriousness however, this is not how this should be done.
But this is just a test... so I'm just gonna weld this mess together:

Mediocre welding technique aside (anyone looked closely at a Cannondale bike frame?), what was many is now one.

And polishing makes it look, if not perfect, then just a wee bit better.
One test cam? Check!


No comments:
Post a Comment