Showing posts with label Bodywork. Show all posts

Sunday, 18 February 2018

Rain forest part 7 - portafilter handle

Final rain forest accoutrement underway. 

Some octagonal stock in the chuck and a CNC profile for the lathe to follow.
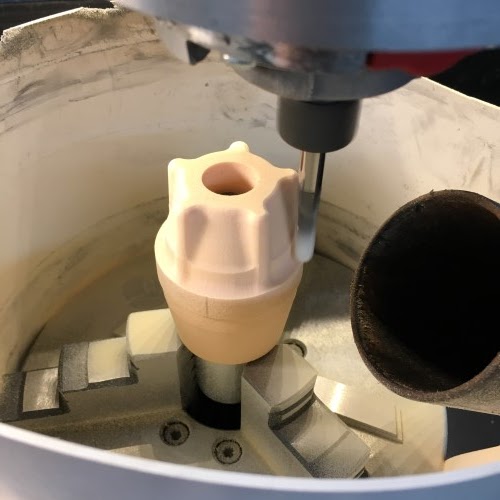

Profile done.


A light sanding.


Drill and tap the blank (because one may as well).


The hardest part of this was making the brass M10 studs from scratch because I had no threaded stock on hand nor any bolts that could be sacrificed.


Once the epoxy holding the studs in place dries, I can flip the part and sand the pommel.


Finished parts before oiling.


Just a touch nicer than their molded ABS cousins IMHO.


Wednesday, 13 December 2017

Rain forest part 6 - wood blanks

Wood blanks going through the same workflow at the foam parts.

First roughing step down.


Quite a long time later ...


A little sanding, some oil and with the brass inserts glued in place, these are done.


Friday, 10 November 2017

Rain forest part 5 - adventures in foam

The smart way to fabricate the valve handles is to make them out of plastic using an injection-molding machine (actually, the smart way is just to buy them, but anyhow). However, as we don't necessarily do things the "smart" way around here and wood is rather difficult to melt, that method has been ruled out. Consequently, there are quite a few machining steps that have to gone through in order to make these individually. Getting the order of operations right is important because we might find ourselves 'machined into a corner' and unable to hold the parts before they are completed.

Starting with the foam blank cut to finished length in the lathe, I bored out the front and back interior profiles.


The front:


and the back:


Now, I want to put an outside taper on the back while the stock is still in the lathe. This is problematic as I will no longer be able to hold the back of the part in a chuck after I cut the taper. This calls for a stub or jig that fits the interior profile of the stock.

Drill and tap a hole in some aluminum round bar:


and then machine the tapped end to the correct diameter.


Now I can cut the taper.


All the operations on the lathe are done and I can move the part, securely fastened to the stub, over to the mill.


The milling program roughs out a perimeter to a certain depth and then refines the shape moving back upwards before stepping down to the next roughing level. The white rubber keeps the dust (mostly) within the range of the vacuum.


...down to the fourth roughing level.


... a few levels more and then I can take the part off the mill.


The threaded brass insert from the valve fits snugly in the foam version and will be glued in place for the finished parts.


I (heart) foam.


Sunday, 29 October 2017

Rain forest part 4 - all cylinders

Today on the bidoowee channel: we are making cylinders!

I was holding back from tackling the handles for the steam and h.w. in the hopes that I could find something off the shelf. I've been looking for months and I have a number of candidates, but there are problems or complexities with them all so I am admitting defeat and making them out of tree. I wasn't particularly happy about having both wood and plastic in the design in any case, so there is an upside.

All that to say, we are not out of the woods yet ;-)

I cut another section out of leftover lumber and ripped it into two squares profiles.


Then I knocked the corners off to get closer to the final shape. 


Then I put the dreaded four jaw chuck on the lathe. I hate these things - what a pita: use a dial gauge to measure one side of the stock. Rotate the workpiece 180 degrees without upsetting the gauge, measure again. Move the stock by adjusting the jaws by half of the offset between the opposite sides. Repeat until it is correct or you get bored. Then do it again for the other two opposing sides. Tighten everything down, then readjust because the stock is soft. Requires the patience of saints.


I did some fairly careful planning for cutting these parts because they are reasonably complicated. I figured that I can get all the pieces out of two 29 1/4" lengths. The octagons just fit between the chuck and the tailstock of the lathe and, with about 1/8" to spare between the thread chasing dial (which I thankfully no longer have to use 'cause CNC is the just the bees' knees for threading thank you very much) and the pillow block, there is enough travel to machine the entire length. 


The setup for the machining requires good dust extraction to keep all the crap from getting onto the ways and into the screws. A metal lathe is really not the correct tool for this job, but I don't have an alternative. So, I found a high tech solution: elastic bands and bailing wire to hold the vacuum nozzle in place and scrap of plexi held with a magnet.


A number of passes were required, but the carbide bit is fairly sharp and leaves a reasonable finish on the wood. 


I also made a blank out of foam so that I have an expendable test piece that wont break any tooling during the next phase of machining.


Result? Two wooden dowels and a foam blank. Total excitement.


Tuesday, 24 October 2017

Rain forest part 3 - rail corners

Next episode in the on-going subdivision of my piece of exotic ligneous plant: the rail corners.

First job is to put shoulders on the exterior of the round over.


Then the same thing on the inside, finally cutting out a left-over square of stock.


Then, using exactly the same setup as before on the chop saw they get cut to length.


Then, it was time for the biggest head scratcher of the day: how to chamfer all eight interior corners without it taking all day. I'm sure there is a more efficient way to do this, but I don't know what it is.


A quick trip trip on the round-over plus a bit of sanding and they are off to the finishing department.


Done!


Saturday, 14 October 2017

Rain forest part 2

More clues...

I chopped up that fabulous piece of lumber and sent it out to be dressed at Atelier Clark, the cooperative shop wing of the Clark artist run centre and general benevolent force in the universe.


Back from the planer, jointer and shaper:


A close-up of the profiles.


Two squares, one with a round over, two different rectangles and one length of left-over.
Of course, I changed my mind on the design and had to laminate a some extra material to one of the profiles. After which I added shoulders to both sides.


Then I made a simple jig to hold the shouldered profile at an angle to the (ripping) blade.


And then I cut off a little tiny wedge that I know is useless, but wont be able to throw away.


On to the chop saw with a block plus a piece of round rod to set the length.
The rod is removed before the cut is made to allow space for the part to move away from the blade safely. The circular form of the rod means that dust/chips can't get between the end of the stock and the block thus guaranteeing a consistent length.


... et voila, the rough part. 


Rinse and repeat 21 more times.


And now I also have a lovely collection of wedgy off cuts that will never ever leave the shop.


Adding a matching shoulder to the top and bottom.


By now, I sure you have all figured out what this is for... but if not, here is a test fit.


A little head-scratching was required to come up with a quick way to chamfer all four corners so that they don't interfere with the inside radius of the sheet metal.


... finally, 22 cup warmer rail stops...


... which all have to be finished with a tiny round-over bit and some old-fashioned sand paper.


Home stretch! The tung-oil finish. I love this stuff. Non-toxic and easy to work with. Just brush it on, let it soak in and wipe off the excess.


And here, after about a day spent more in figuring out how to make them than actually making them, they are.