Wednesday, 23 October 2013

Prox sensors

Research for proximity sensors

The Omron proximity switches that are going to be implemented are 12V/24V E2E-X5MF2 which are PNP-NC (normally closed). Data sheet here

They were bought to replace some surplus E2E-X2ME1-M1 which are NPN - NO (normally open). 


The normally closed configuration is far easier to implement with the cnc4pc breakout board.

Circuit diagram for hookup:


My pin assignments for future reference:

Sensor cable > Cable strand # > task (Control box wire colour)
blue               >      1                > 0V (blue)
brown           >      2                 > +24V (yellow)
black             >      3                > signal (green)


Connecting 3-wire PNP outputs in series:

Click to enlarge - SeriesConnPNPtransOutputs

Note from www.ab.com:
Series connection of 3-wire PNP output devices requires each device in the series to supply power to the next device with the last device in the chain supplying power to the load. Because each device supplies power to the next, response time is equal to the response time of the first sensor plus the sum of the turn on times of the others. The output of each sensor must be capable of supplying the peak load currents of subsequent sensors plus the current of the load. To overcome the internal supply capacitance of subsequent sensors, a low value (10 ohm) resistor is sometimes required in series with each.


A few brackets and new holes in the column later and here is one half of the Z axis. I can get away with using only a single sensor with two adjustable stops made from stainless rod. I milled a flat on the sections of rod so that the sensor "sees" more material as it crosses the threshold; perhaps this is not necessary (but it looks nice).


In the bottom if the frame below you can see piece of green masking tape. This is a little trick I learned from some conservation staff in a museum where, for obvious reasons, dust control is a big deal. Whenever they drilled into a wall they would tape a pouch made from scrap paper or newspaper right underneath the hole to catch the dust before it fell onto the floor. No cleanup afterwards [hand slap to the forehead]!!! 


The next question is how to splice the sensor cables to extensions. The location of the connections is going to be within the work area of the mill which means, if coolant is going to be used, that they have to be watertight. One possibility for this are TE MiniSeal Splices.

Available from Mouser at a mere $2 a pop!

http://ca.mouser.com/_/?Keyword=miniseal+wire+splice&FS=True
The D-436-36 model is for 20-26 AWG wire.

Tuesday, 22 October 2013

Finished counter balance

Here is the finished system. The project was premised on the availability of close-assist springs - which turn out to be about five times the price of the 'regular' ones. So one redesign later...


The head weighs around 220lbs and the Z slide probably another 40 - 50lbs. The gas spring (from Mcmaster) has close to 10" of travel and a 225lb rating. However, the head travel is around 17", so I set the spring side up with an extra pulley to halve the travel, but at the expense of doubling the load; so the spring will actually see around 500lbs. In practice however, presumably because of the cumulative friction (the ways, chain and all the bearings) the system holds the head even when the stepper is not powered. I angled the chain away from the axis of the spring slightly with the intention of equalizing the radial loading. However, thinking about again, I'm not sure this was the best plan. The whole setup is adjustable so I may move the chain in further to reduce the angle or replace the single spring with a pair that are offset to generate stability in the weak axis. But if it ain't broke...


Sunday, 20 October 2013

Other people's RF 45 projects

I set out this afternoon to research limit switches. I didn't find much, but I did come across some excellent projects that I hadn't seen before (but wish that I had looked at before starting this one!)


Rlberg (Bob Campbel?)'s conversion underway here: 

http://www.rlberg.com/RF45.html

Lots of good ideas and some very nice controller units.


And another here from JRouche on Home Shop Machinist (though this one has been running since 2006... so don't hold your breath :)

http://bbs.homeshopmachinist.net/threads/58904-Enco-square-column-(RF-45-clone)-CNC-build/page5


Nice article from Graetech on upgrading the bearings in the spindle and gear box. 

http://www.graetech.com/index_files/Page975.htm


Another excellent conversion, though the site is hugely annoying - you have to be a member to look at images - wtf?

Would you believe it? Machinetoolswarehouse has a 3ΓΈ replacement motor for the MD001 for $149.... Hmmmmmm. 

https://www.machinetoolswarehouse.com/xcart/catalog/Motor-3-phase-2-hp-p-16246.html?keep_https=yes


Clever Dutch guy with air tool power draw bar, spindle lock and drill stop.

http://m.youtube.com/watch?v=4oL-XcKPiKg&feature=related&desktop_uri=%2Fwatch%3Fv%3D4oL-XcKPiKg%26feature%3Drelated

Saturday, 19 October 2013

Counter balance

As with quite a few of these mini-projects for the conversion, a big part of the challenge is figuring out a temporary solution for problems that require the machine itself to resolve permanently. The counterweight system is a case in point. I didn't have anything conveniently shaped and heavy enough to offset the mass of the head. So instead, I put together a Rube Goldbergesque arrangement of improvised pulleys (shackles with bits of tube for rollers) and some more plywood scraps to make a block and tackle. This part worked fine, generating more than enough resistance with a single piece of 1" steel plate.


The idler sprockets directly above the Z-slide proved more troublesome. There is no space to put an axle all the way through as the support posts for the stepper mount interfere. Consequently, the sprockets have to be bolted onto the mounting plates creating a cantilever condition which generates enough torque to significantly bend the 1/2" birch plywood. Even with an F-clamp installed, the bending was enough to make the chain start to misfeed occasionally!


Still, it works well enough to actually cut parts using all three axes for the first time. 


The first parts cut are of course the necessaries for the permanent version of the counter-balance system.


Friday, 27 September 2013

Way covers

Notes and research on way covers


http://www.cnczone.com/forums/general-metalwork-discussion/58425-first-home-made-way-cover-bellows.html

___________________

http://www.franksworkshop.com.au/CNC/Bellows/Bellows.htm

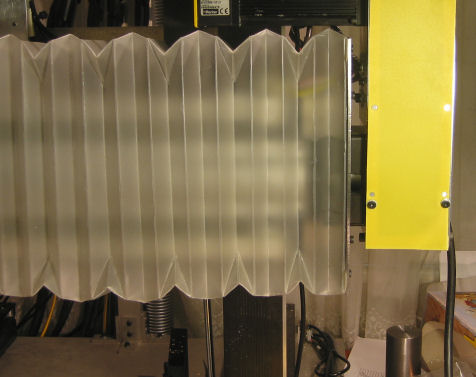
Folded polypropylene !


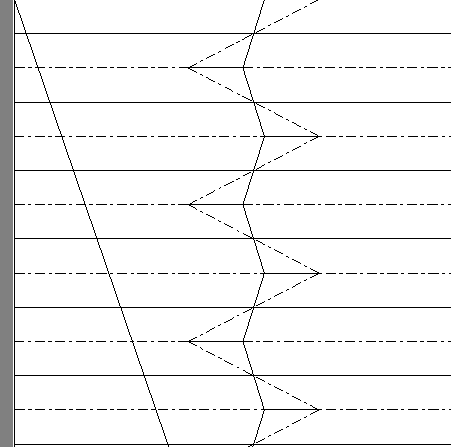
Optimized folding pattern holds its shape maximizes extension vs compression ratio


http://my.net-link.net/~jsmigiel/bellows.html


Update 2013 10 19

I needed a quick solution to get up and running, so I threw together a couple of large scraps of leather and aluminum. Works well enough for now! The only serious drawback is that they get sucked up into the shop vac when cleaning up. A couple of lateral stiffeners would resolve this. Perhaps they could also be U-shaped to force the leather down and around the ways...


Sunday, 22 September 2013

Last Z parts

Fixed bearing mounting plate. I fortuitously found a new NSK bearing on eBay for which it would appear my surplus THK ball-screw journal was designed for. The label on the box for the Z ball screw is:

THK
Lm System
Model: BIF2504E-10RRG0+895LC2
Serial  KX07G01373

https://tech.thk.com/en/products/pdfs/en_a15_188.pdf

Although some of the info in that PDF is a little contradictory. The dimensions seem correct for the 2504-10 "semi standard" size, but the flange shape is different...


Motor mounting plate. Note that both have the CNC signature rounded corners that are essentially impossible (I.e. far too much trouble) to do on a manual mill.


A second mounting plate for the top of the column. This is sligtly redundant, but the bearing is thicker than the first plate and the mounting position (which I definitively established only after tearing down the column) would require cutting out an inch or so of the casting with hand tools. The second plate also allowed me to integrate a counter-balance design for the head, which I had neglected to think about when I cut the first plate.


Lastly, the ball-nut mount. The X axis screw came with a nut-mount which I just couldn't use in that tiny space inside the saddle. It is well made and seemed a shame to waste so I came up with a strategy to reuse it. I didn't have any 2" Mic 6 stock on hand, but making the extension for the mount out of two 1" pieces was pretty straight forward. The tube in the middle fits snugly into the hole in the Z slide that was a generous clearance fit for a 13mm bolt. I'm using a 1/2" bolt instead . The tube will do the job that the two taper-pins were doing in the initial design I.e. pin the nut-mount to the slide while the bolts hold it in the correct position. However, because there is now only one "pin", the nut is still free to rotate so it can be aligned perfectly along the axis of the screw. I just didn't see any way (or real need) to get the holes for two existing pins correctly positioned. Instead I'm replacing the pins with a couple of 1/4-20 bolts for extra (and likely superfluous) holding power.